Page 22 - How to Splice Rope
Published by Ronald Caplan on 1973/3/1 (4880 reads)

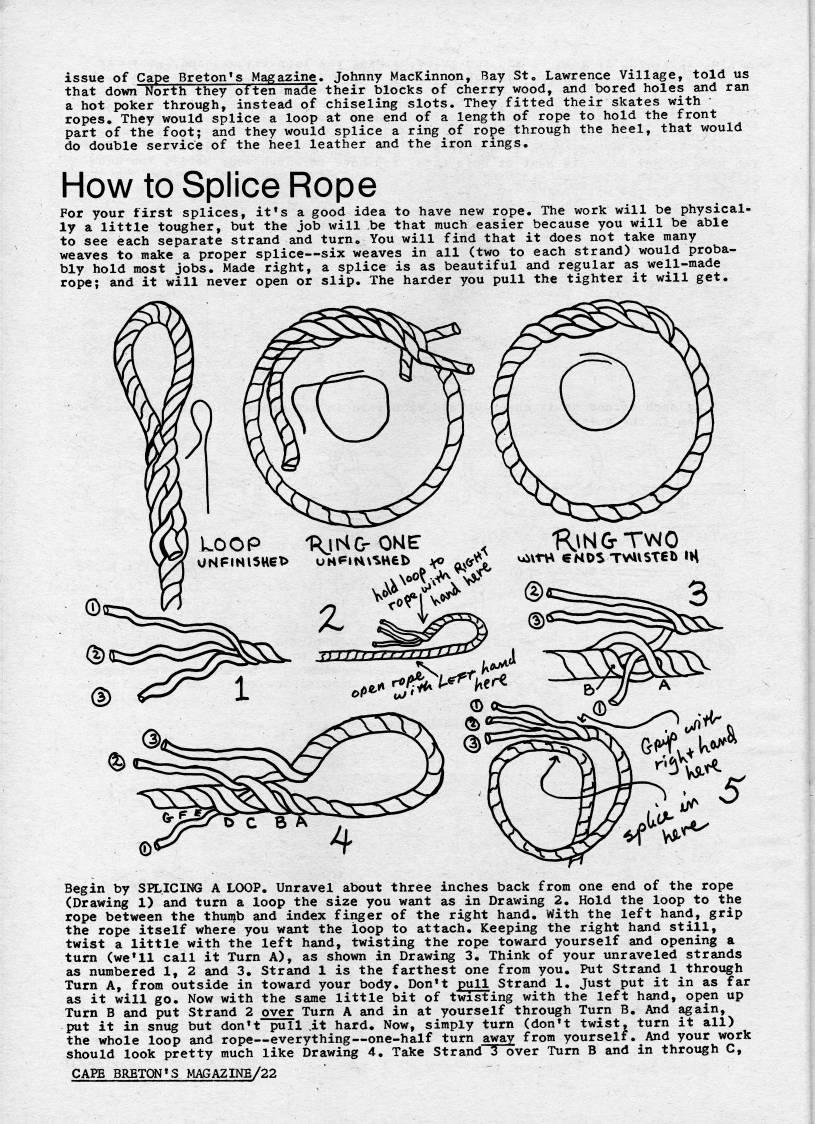
issue of Cape Breton's Magazine. Johnny MacKinnon, Bay St • Lawrence Village, told us that down North they often made their blocks of cherry wood, and bored holes and ran a hot poker through, instead of chiseling slots. They fitted their skates with ropes. They would splice a loop at one end of a length of rope to hold the front part of the foot; and they would splice a ring of rope through the heel, that would do double service of the heel leather and the iron rings. How to Splice Rope For your first splices, it's a good idea to have new rope. The work will be physical? ly a little tougher, but the job will be that much easier because you will be able to see each separate strand and turn. You will find that it does not take many weaves to make a proper splice • six weaves in all (two to each strand) would proba? bly hold most jobs. Made right, a splice is as beautiful and regular as well-made rope; and it will never open or slip. The harder you pull the tighter it will get. LOOP -RjKC-ONE . 'R, NGrTWO Begin by SPLICING A LOOP. Unravel about three inches back from one end of the rope (Drawing 1) and turn a loop the size you want as in Drawing 2. Hold the loop to the rope between the thumb and index finger of the right hand. With the left hand, grip the rope itself where you want the loop to attach. Keeping the right hand still, twist a little with the left hand, twisting the rope toward yourself and opening a turn (we'll call it Turn A), as shown in Drawing 3. Think of your unraveled strands as numbered 1, 2 and 3. Strand 1 is the farthest one from you. Put Strand 1 throi'h Turn A, from outside in toward your body. Don't pull Strand 1, Just put it in as far as it will go. Now with the same little bit of twisting with the left hand, open up Turn B and put Strand 2 over Turn A and in at yourself through Turn B. And again, put it in snug but don't pull ,it hard. Now, simply turn (don't twist, turn it all) the whole loop and rope • everything • one-half turn away from yourself. And your work should look pretty much like Drawing 4, Take Strand 3 over Turn B and in through C, CAPE BRETON'S MAGA2INB/22


Adobe Acrobat Reader is required to the PDF version of this content. Click here to download and install the Acrobat plugin