Page 23 - How to Splice Rope
Published by Ronald Caplan on 1973/3/1 (1375 reads)

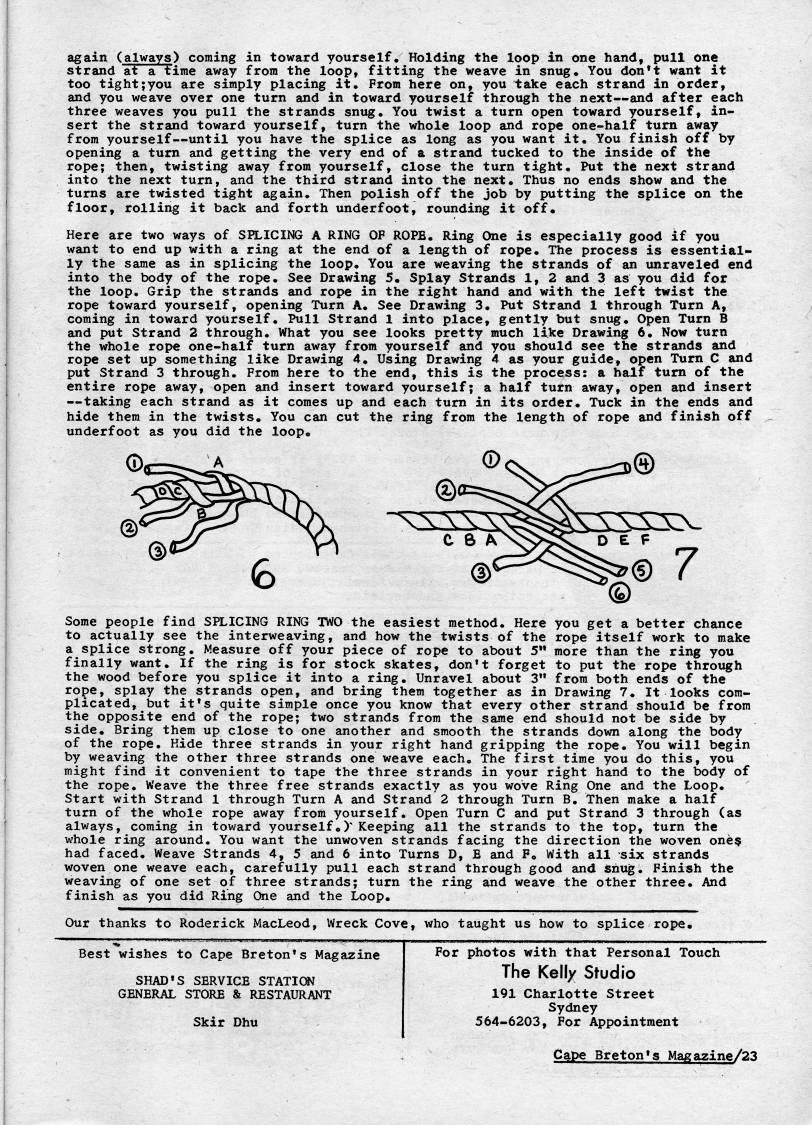
again (always) coming in toward yourself. Holding the loop in one hand, pull one strand at a time away from the loop, fitting the weave in snug. You don't want it too tight;you are simply placing it. From here on, you take each strand in order, and you weave over one turn and in toward yourself through the next • and after each three weaves you pull the strands snug. You twist a turn open toward yourself, in? sert the strand toward yourself, turn the whole loop and rope one-half turn away from yourself • until you have the splice as long as you want it. You finish off by opening a turn and getting the very end of a strand tucked to the inside of the rope; then, twisting away from yourself, close the turn tight. Put the next strand into the next turn, and the third strand into the next. Thus no ends show and the turns are twisted tight again. Then polish off the job by putting the splice on the floor, rolling it back and forth underfoot, rounding it off. Here are two ways of SPLICING A RING OF ROPE. Ring One is especially good if you want to end up with a ring at the end of a length of rope. The process is essential? ly the same as in splicing the loop. You are weaving the strands of an unraveled end into the body of the rope. See Drawing 5. Splay Strands 1, 2 and 3 as you did for the loop. Grip the strands and rope in the right hand and with the left twist the rope toward yourself, opening Turn A. See Drawing 3. Put Strand 1 through Turn A, coming in toward yourself. Pull Strand 1 into place, gently but snug. Open Turn B and put Strand 2 through. What you see looks pretty much like Drawing 6. Now turn the whole rope one-half turn away from yourself and you should see the strands and rope set up something like Drawing 4. Using Drawing 4 as your guide, open Turn C and put Strand 3 through. From here to the end, this is the process: a half turn of the entire rope away, open and insert toward yourself; a half turn away, open and insert • taking each strand as it comes up and each turn in its order. Tuck in the ends and hide them in the twists. You can cut the ring from the length of rope and finish off underfoot as you did the loop. Some people find SPLICING RING TWO the easiest method. Here you get a better chance to actually see the interweaving, and how the twists of the rope itself work to make a splice strong. Measure off your piece of rope to about 5" more than the ring you finally want. If the ring is for stock skates, don't forget to put the rope through the wood before you splice it into a ring. Unravel about 3" from both ends of the rope, splay the strands open, and bring them together as in Drawing 7, It looks com? plicated, but it's quite simple once you know that every other strand should be from the opposite end of the rope; two strands from the same end should not be side by side. Bring them up close to one another and smooth the strands down along the body of the rope. Hide three strands in your right hand gripping the rope. You will begin by weaving the other three strands one weave each. The first time you do this, you might find it convenient to tape the three strands in your right hand to the body of the rope. Weave the three free strands exactly as you wove Ring One and the Loop. Start with Strand 1 through Turn A and Strand 2 through Turn B, Then make a half turn of the whole rope away from yourself. Open Turn C and put Strand 3 through (as always, coming in toward yourself.)'Keeping all the strands to the top, turn the whole ring around. You want the unwoven strands facing the direction the woven one$ had faced. Weave Strands 4, 5 and 6 into Turns D, E and F. With all six strands woven one weave each, carefully pull each strand through good and snug. Finish the weaving of one set of three strands; turn the ring and weave the other three. And finish as you did Ring One and the Loop. Our thanks to Roderick MacLeod, Wreck Cove, who taught us how to splice rope. Best wishes to Cape Breton's Magazine SHAD'S SERVICE STATK' GENERAL STORE & RESTAURANT Skir Dhu For photos with that Personal Touch The Kelly Studio 191 Charlotte Street Sydney 564-6203, For Appointment Cape Breton's Magazine/23


Adobe Acrobat Reader is required to the PDF version of this content. Click here to download and install the Acrobat plugin